Subscribe Us

LightBlog

Wednesday, 28 October 2020

October 28, 2020

CRUD Operations In Angular 7 Using Web API (PART-1)

 Step 1. Create a database table

Create a database. Open SQL Server and create a new database table. As you can see from the following image, I create a database table called EmployeeDetails with 7 columns.


Note: If you already have an existing database and table, you can skip this step. 
 
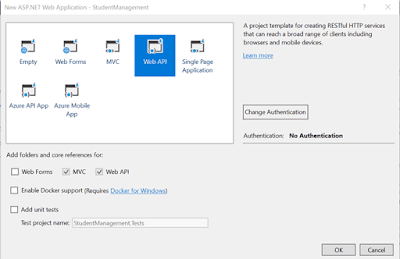
Step 2. Create a Web API Project
 
Now, we will create a Web API with the functionality of Create, Replace, Update, and Delete (CRUD) operations.
 
Open Visual Studio >> File >> New >> Project >> Select Web Application. After that click OK and you will see the templates. Select the Web API template.
Click OK.

To install this package, you can execute the following command from the NuGet package manager console.

Install-Package EntityFramework -Version 6.4.4
 
Step 3. Add ADO.NET Entity Data Model
 
Now, Select Models folder >> Right click >>Add >> New Item >> select Data in left panel >>ADO.NET Entity Data Model

Now click Add button then select EF Designer from database >> Next >> After that give your SQL credential and select the database where your database table and data are.
 Click the Add button and select your table and click on the Finish button.

Step 4. CRUD Operations
 
Now, we will write code to perform CRUD operation.
 
Go to the Controller folder in our API Application and right click >> Add >> Controller >> Select Web API 2 Controller-Empty 

Now, we will go to the controller class and set the routing to make it more user friendly by writing the below code.

  1. namespace CRUDAPI.Controllers  
  2. {  
  3.     [RoutePrefix("Api/Employee")]  
  4.     public class EmployeeAPIController : ApiController  
  5.     {  
  6.         WebApiDbEntities objEntity = new WebApiDbEntities();  
  7.          
  8.         [HttpGet]  
  9.         [Route("AllEmployeeDetails")]  
  10.         public IQueryable<EmployeeDetail> GetEmaployee()  
  11.         {  
  12.             try  
  13.             {  
  14.                 return objEntity.EmployeeDetails;  
  15.             }  
  16.             catch(Exception)  
  17.             {  
  18.                 throw;  
  19.             }  
  20.         }  
  21.   
  22.         [HttpGet]  
  23.         [Route("GetEmployeeDetailsById/{employeeId}")]  
  24.         public IHttpActionResult GetEmaployeeById(string employeeId)  
  25.         {  
  26.             EmployeeDetail objEmp = new EmployeeDetail();  
  27.             int ID = Convert.ToInt32(employeeId);  
  28.             try  
  29.             {  
  30.                  objEmp = objEntity.EmployeeDetails.Find(ID);  
  31.                 if (objEmp == null)  
  32.                 {  
  33.                     return NotFound();  
  34.                 }  
  35.   
  36.             }  
  37.             catch (Exception)  
  38.             {  
  39.                 throw;  
  40.             }  
  41.             
  42.             return Ok(objEmp);  
  43.         }  
  44.   
  45.         [HttpPost]  
  46.         [Route("InsertEmployeeDetails")]  
  47.         public IHttpActionResult PostEmaployee(EmployeeDetail data)  
  48.         {  
  49.              
  50.             if (!ModelState.IsValid)  
  51.             {  
  52.                 return BadRequest(ModelState);  
  53.             }  
  54.             try  
  55.             {  
  56.                 objEntity.EmployeeDetails.Add(data);  
  57.                 objEntity.SaveChanges();  
  58.             }  
  59.             catch(Exception)  
  60.             {  
  61.                 throw;  
  62.             }  
  63.   
  64.             return Ok(data);  
  65.         }  
  66.          
  67.         [HttpPut]  
  68.         [Route("UpdateEmployeeDetails")]  
  69.         public IHttpActionResult PutEmaployeeMaster(EmployeeDetail employee)  
  70.         {  
  71.             if (!ModelState.IsValid)  
  72.             {  
  73.                 return BadRequest(ModelState);  
  74.             }  
  75.   
  76.             try  
  77.             {  
  78.                 EmployeeDetail objEmp = new EmployeeDetail();  
  79.                 objEmp = objEntity.EmployeeDetails.Find(employee.EmpId);  
  80.                 if (objEmp != null)  
  81.                 {  
  82.                     objEmp.EmpName = employee.EmpName;  
  83.                     objEmp.Address = employee.Address;  
  84.                     objEmp.EmailId = employee.EmailId;  
  85.                     objEmp.DateOfBirth = employee.DateOfBirth;  
  86.                     objEmp.Gender = employee.Gender;  
  87.                     objEmp.PinCode = employee.PinCode;  
  88.   
  89.                 }  
  90.                 int i = this.objEntity.SaveChanges();  
  91.   
  92.             }  
  93.             catch(Exception)  
  94.             {  
  95.                 throw;  
  96.             }  
  97.             return Ok(employee);  
  98.         }  
  99.         [HttpDelete]  
  100.         [Route("DeleteEmployeeDetails")]  
  101.         public IHttpActionResult DeleteEmaployeeDelete(int id)  
  102.         {  
  103.             //int empId = Convert.ToInt32(id);  
  104.             EmployeeDetail emaployee = objEntity.EmployeeDetails.Find(id);  
  105.             if (emaployee == null)  
  106.             {  
  107.                 return NotFound();  
  108.             }  
  109.   
  110.             objEntity.EmployeeDetails.Remove(emaployee);  
  111.             objEntity.SaveChanges();  
  112.   
  113.             return Ok(emaployee);  
  114.         }  
  115.     }  
  116. }  
(Please refer further process for next PART-2)

Thursday, 27 August 2020

August 27, 2020

Web API 2 With Entity Framework 6 Code First Migrations

In this article, i will show you, crud operation code first approach in ASP.NET MVC entity framework:

1. I am using Visual Studio 2017. Open the Visual Studio and add a new project.

2.Choose the “Web” option in installed templates and choose “ASP.NET Web Application (.NET Framework)”. Give the proper name of project. and select .net framework. Then click on OK.

3.When you click OK, you’ll be prompted to choose the type of ASP.NET Web Application. Choose Web API and click OK.


  • Install this package from Tools menu-> nuget package manger-> Package manager console-> Install-Package EntityFramework
4.Right-click Models folder and add a new class. Name the class as “Student”.
5.Make the class public and add two properties to the class, i.e., Id and Name. Id will serve as     a primary key to this entity.

 public class Student  
    {  
        public int Id { get; set; }  
        public string Name { get; set; }  
    }  
6.Rebuild the solution.
7. Right click the controller folder and add choose the option to add a new controller class.
8. In the next prompt, choose the option to create a Web API 2 Controller with actions, using        Entity Framework. Click on Add button.
9. Next, choose the model we created i.e. Student model in the option of Model class.
10. Since we do not have data context for our application, click on the + button close to Data          context class option dropdown, and provide the name “StudentManagementContext” in            the text box shown and click Add.
11.The name of the controller should be “StudentsController”. Click Add to finish.
12. In that controller scaffolding template will provide you the method of CRUD operation.

Entity Framework Code First Migrations

  • Open Package Manager Console and select the default project as your WebAPI project. Type the command Enable-Migrations and press enter.
  • Once the command is executed, it does some changes to our solution. As a part of adding migrations, it creates a Migrations folder and adds a class file named ”Configuration.cs”. This class is derived from DbMigrationsConfiguration class. 
  • The context parameter is the instance of our context class that got generated while we were adding a controller. We provided the name as StudentManagementContext. This class derives from DbContext class. This context class takes care of DB schema and the DbSet properties of this class are basically the tables that we’ll have when our database will be created. It added Students as a DbSet property that returns our Student model/entity and would be directly mapped to the table that will be generated in the database.
  • The next step is to execute the command named “Add-Migrations”. In the package manager console, execute this command with a parameter of your choice that would be the name of our first migration. I call it ”Initial”. So, the command would be Add-Migrations Initial.
  • Again in the package manager console, run the command “Update-Database”.

Let’s see what we got in our database when the earlier command got successfully executed.

  1. Since we used the local database, we can open it by opening Server Explorer from the View tab in Visual Studio itself.
  2. Once the Server Explorer is shown, we can find the StudentManagementContext database generated and it has two tables named Students and __MigrationHistory. Students table corresponds to our Student model in the code base and __MigrationsHistory table is the auto-generated table that keeps track of the executed migrations.